Last Updated on February 6, 2023
Are you a DIY enthusiast looking to get your hands dirty and make some home improvements? Well, if you’re planning on tackling projects that require the use of power tools like table saws, then it’s important for safety reasons that you know how to change a table saw blade. This blog post will walk through all the steps necessary, so don’t worry – by the end of this guide, changing out blades will be as easy as pie. So buckle up and let’s dive in – we’ll take it step-by-step, so even novice woodworkers can follow along with confidence. Let’s learn together how to change a table saw blade safely and efficiently.
Table of Contents:
- Safety First
- Preparing to Change the Blade
- Installing the New Blade
- Testing Out Your Handiwork
- FAQs in Relation to How to Change a Table Saw Blade
- Conclusion
Safety First
When it comes to changing a table saw blade, safety should always be your top priority. Before you begin, make sure the saw is unplugged and that you’re wearing protective gear such as goggles and gloves. It’s also important to check the area around the saw for any loose items or debris that could get caught in the blade when it’s spinning.
Preparing to Change the Blade
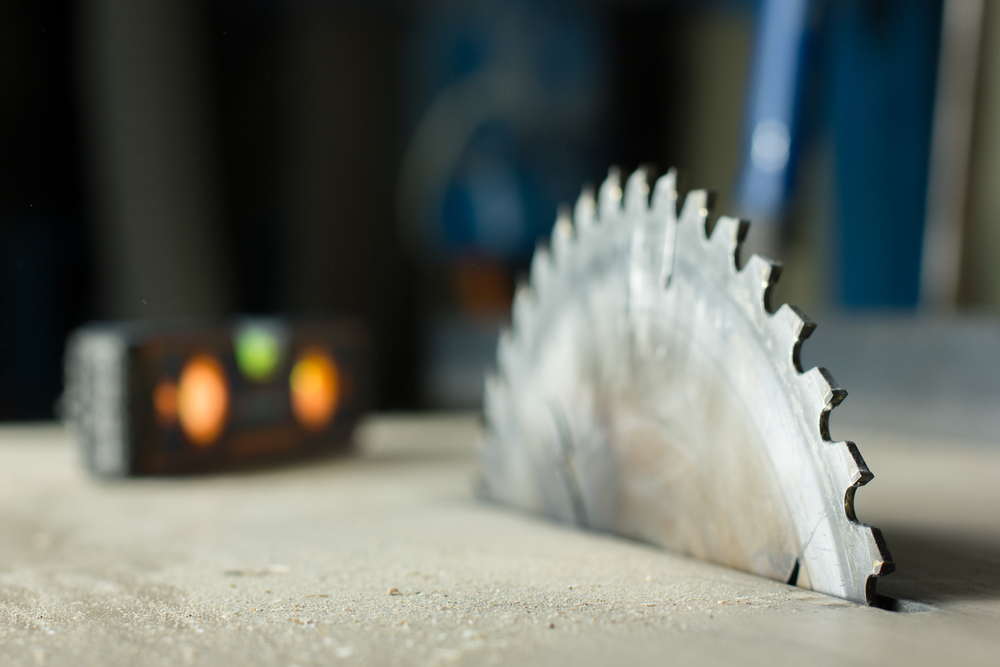
Before installing a new blade on your saw, it’s important to prepare the old one for removal. The first step is to loosen the arbour nut that holds the blade in place. This nut will be located at the centre of your saw and should be easy to identify.
Using an adjustable wrench or socket set, carefully loosen the arbour nut until it comes off completely. Be sure not to over-tighten, as this could damage your saw and blade. Once you have removed the arbour nut, look at how tight or loose the tension is on your current blade before removing it from its slot. If there is too much tension, use an appropriate tool such as a flathead screwdriver or hex key to adjust accordingly until there is no more pressure being applied against either side of the blade when spinning freely by hand.
Once you have loosened any tension from around your existing blade, ensure all safety guards are in place before proceeding with the removal of said blade. These guards help protect users from injury due to accidental contact with moving parts during operation, so they must always remain intact while working with blades. With everything secure and safe, gently lift up on one end of your old sawblade until it slides out from its slot for you to remove it completely without damaging anything else nearby, such as other components within close proximity.
Installing the New Blade
Installing a new blade is an important part of maintaining your saw. It’s not difficult, but it does require precision and care to ensure the best results.
Aligning the Blade With the Miter Slot
The first step in installing a new blade is aligning it with the mitre slot on your saw table. This ensures that when you cut, the blade will move smoothly along its track without any binding or wobbling. To do this, loosen up both sides of the arbour nut so you can slide out and adjust the old blade as needed. Once you have removed it, place your new blade into position over the top of the mitre slot and make sure that all four corners are properly aligned with each other. Tighten down both sides of the arbour nut until they’re snug against either side of your new blade – don’t overtighten.
Tightening Down the Arbour Nut
Once you have positioned your new blade correctly within its mitre slot, it’s time to tighten down its arbour nut securely. This is done by using a wrench or socket set specifically designed for this purpose – never use regular tools like pliers or screwdrivers, as these could damage both your tool and yourself. Start by tightening one side at a time until there is no more play between them before moving on to tightening down both sides evenly together until everything feels secure but still has some give if necessary (you should be able to rotate it slightly). Don’t forget to check after every few turns that nothing has shifted out of alignment during tightening.
Once the new blade is securely attached to the saw, it’s time to test out your handiwork and make sure everything is in working order.
Testing Out Your Handiwork
Once you’ve installed the new blade, it’s time to test out your handiwork. To do this, start by running the saw through a piece of scrap wood or other material. This will help you determine if the blade is aligned correctly and cutting properly.
If possible, use a square to check for alignment. If everything looks good, move on to making a few cuts with the new blade in different materials, such as plywood or hardwoods like oak and maple. Pay attention to how smoothly it runs and whether there are any snags or rough spots when cutting curves or angles.
Finally, take note of how much dust is being produced while using the saw with its new blade – too much dust could indicate that something isn’t quite right with either your technique or setup, so make sure you keep an eye on this throughout testing.
Once you’ve tested out your handiwork in all these areas and are satisfied that everything is working as expected, then congratulations – you can now get back to whatever project you were working on before changing blades.
FAQs in Relation to How to Change a Table Saw Blade
How do you put a new blade on a table saw?
Replacing the blade on a table saw is a relatively simple process. First, unplug the power cord from the wall outlet and remove any existing blades. Then, loosen the arbour nut with an adjustable wrench or socket wrench and lift off the old blade. Install your new blade onto the arbour shaft, making sure that it’s properly aligned with its teeth facing forward. Securely tighten down the arbour nut to ensure that your new blade is firmly in place before plugging back into the power source and testing out your newly installed sawblade.
Which way do you turn to loosen a table saw blade?
To loosen a table saw blade, you should turn the arbour nut counterclockwise. The arbour nut is located on the top of the saw and holds the blade in place. It can be loosened with an adjustable wrench or socket wrench. Be sure to use caution when turning it as it may be tight and could cause injury if not handled properly. Once loose, you can remove the blade from its housing for maintenance or replacement purposes.
How do you change the blade on a Craftsman table saw?
Changing the blade on a Craftsman table saw is relatively simple. First, unplug the saw and raise the blade to its highest position. Then loosen the arbour nut with a wrench or socket set. Next, remove the old blade from the arbour shaft and replace it with your new one. Finally, tighten down the arbour nut securely and lower your blade back into place before plugging in your saw again. With these steps, you can easily change out blades on any Craftsman table saw.
How do you change a table saw blade without an arbour wrench?
Changing a table saw blade without an arbour wrench can be done, but it requires some extra steps. First, unplug the power cord from the wall outlet and remove the blade guard. Next, loosen the nut that holds the blade in place with a pair of pliers or an adjustable wrench. Carefully lift off the old blade and replace it with your new one, making sure to align all teeth in the same direction as before. Finally, tighten down the nut securely by hand or with a pair of pliers and reattach your blade guard for safety purposes.
Conclusion
Congratulations. You’ve just successfully changed a table saw blade. Now you can get back to your woodworking projects with the peace of mind that comes from knowing that your table saw is equipped with a sharp, safe blade. With the right preparation and attention to safety, changing a table saw blade doesn’t have to be intimidating or difficult – it’s all in how you approach it.
Paul is the type of person who never met a problem he couldn’t fix. He can always be found tinkering with something in his house, even if it isn’t broken! His tips and tricks are often shared on our site. He’s the one you call when something breaks because he has been known to improvise fixes for everything from leaky faucets to malfunctioning dryers.