Last Updated on January 10, 2023
Yoghurt has many health benefits, from strengthening your bones and teeth to supporting your digestive health. Yoghurt with live active cultures helps in keeping your intestines healthy.
Having a yoghurt maker is an easy way to increase your calcium content by consuming more homemade yoghurt. You can make it in batches and store it in a cool place until you’re ready for a nutritious snack.
If you’ve just bought your own machine, we’re here to share our most useful tips on how to use a yoghurt maker.
What You Will Need to Use a Yoghurt Maker
You’ll need a high-quality yoghurt maker that’s clean and ready to use. In addition, you’ll also need a liquid measuring cup, saucepan, thermometer, mixing bowl, ladle, spoon, and whisk.
You will also need milk and store-bought yoghurt, if this is your first time making yoghurt.
How to Use a Yoghurt Maker
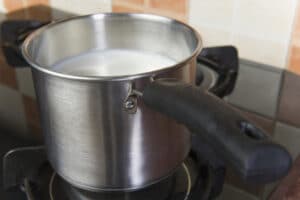
- Heat the milk by pouring full-fat milk into a saucepan over medium heat. The milk should begin to foam around the edges without boiling. Stick to around 82 degrees celsius. Remove the pan from the heat.
- Cool the milk until it’s around 41–44 degrees Celsius. You can speed up this process by filling a bowl with ice. Then, pour the milk into another bowl and place it on top of the ice. This process should take around five minutes, though you’ll need to keep your thermometer handy to make sure it doesn’t get any cooler. Alternatively, leave it in a cool space where it could take up to one hour to cool.
- Add some cooler milk to the room-temperature milk and stir. Gradually add around 120ml at a time and whisk until the mixture becomes smooth. The difference in temperature means that the cooler milk won’t cook, creating the overall texture that you want.
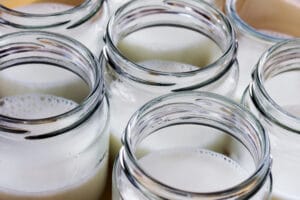
- Once you’ve added up to 250ml of milk to the yoghurt, pour the mixture into a bowl and mix again until the texture is completely smooth.
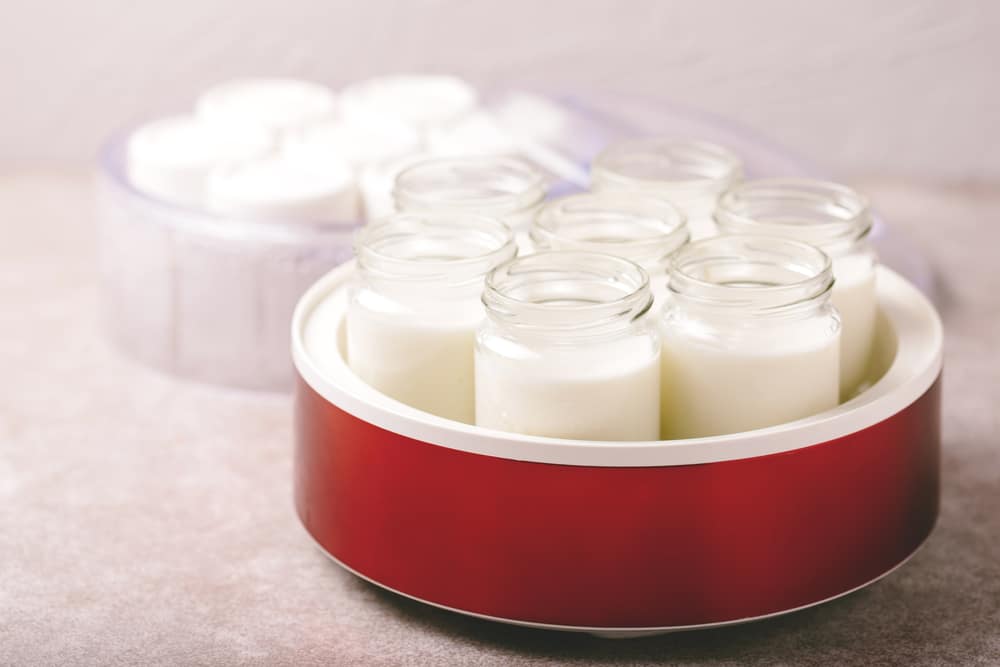
- Fill the yoghurt jars with the mixture, and place them in the yoghurt maker. If your machine only has one large container, place all of the mixture into the glass jar. Keep the lids off of each container, but place the cover on the yoghurt maker.
- Switch on the yoghurt maker, and set it to the desired program. The setting depends on the type of milk you used. Whole milk requires around seven hours, whereas skimmed milk takes up to 10 hours. Don’t disturb the yoghurt, as this could affect the overall taste and texture.
- Once the yoghurt maker has finished incubating, place the lids on each container and refrigerate for at least three hours.
- Once you have eaten all your yoghurt, thoroughly clean out your jars and you can start on a new batch!
Benefits of Using a Yoghurt Maker
There are so many benefits of making your own yoghurt at home. In fact, you can plan around with recipes and flavours every time. Plus, you can play around with different ingredients on the menu, depending on your preferences that day.
Furthermore, you can add less sugar to the yoghurt and eliminate any additives while also increasing nutrients. In particular, you can choose to add fruit and use skim milk for a low-fat alternative.
Making your own yoghurt at home can be an easier and inexpensive alternative to a shop-bought alternative. Simply mix milk, stir, and leave at room temperature for around 8 hours to develop a delicious flavour. Plus, you get more value for your money when choosing to make it yourself.
Choosing Milk for Making Homemade Yoghurt
Cow’s milk is the most popular choice for making yoghurt. This is mainly because the heating process encourages a thick texture. Another popular ingredient is goat’s milk, which results in a thinner texture that’s smoother to taste.
Ways to Make Yoghurt Thicker
Once you’ve made your yoghurt, you might want to focus on a variety of ways to improve its texture—in particular, making it thicker. Below are some great ways to thicken the mixture.
 1. The Heating Process
An easy trick to make yoghurt thicker is to heat up the milk to a higher temperature—perhaps 95 degrees Celsius before adding the yoghurt culture. Then, try holding the milk at this high temperature for around 20 minutes. Doing this allows some of the moisture within the milk to evaporate, concentrating the solids.
2. Letting the Yoghurt Sit for a Long Time
Once heated and cooled, let the yoghurt sit for a longer period of time before placing it in the fridge. Going from one temperature to another will increase the yoghurt’s thickness. After around a seven-hour sit, the thickness and sourness begin to wear off.
3. Using Thickening Ingredients
There are numerous ingredients you can use to thicken yoghurt. Increase the fat content by using whole cream or 2% milk after several batches to gradually increase the consistency over time. Milk solids are a great trick to increase the yoghurt’s thickness without needing any additives or additional heating. You can also add milk powder to improve the firmness as well.
Flavouring Plain Yoghurt
If you want to inject some flavour into your yoghurt, you can play around with the recipe without vastly adding to the sugar content. You can add a variety of flavour-enhancing ingredients before freezing your yoghurt overnight. Here are some delicious ideas the entire family will love:
Homemade strawberry yogurt with granola. I didn’t make the granola. But I did make yogurt and I cooked down some frozen strawberries to put in it! I’m not a doctor, but this is definitely better for you than that packaged stuff at the store, cheap to mak… https://t.co/c4IzmIAjvB pic.twitter.com/hkCzGRsCab
— Aimee Caldwell (@mamoocando) February 16, 2021
- Add flavoured jam and a spoonful of chia seeds. Make sure to add the seeds just before you’re about to eat the yoghurt. Otherwise, it’ll make your homemade yoghurt clumpy.
- Stir in some fresh orange juice or zest from an orange for a tangy flavour that’s naturally sweetened without heaps of artificial sugar.
- Add almond butter and unsweetened shredded coconut to mellow out any sourness from the yoghurt without an overpowering sugary flavour.
- Sweeten plain yoghurt with around five drops of vanilla extract. Add one drop at a time, and then test the flavour.
- Stir in your favourite frozen fruit (such as blueberries, strawberries, and raspberries). You can also make your own frozen fruits by chopping up fresh fruit and adding them to your yoghurt containers. Top with a sprinkle of cinnamon for extra sweetness without using sugar.
- Mix in peanut butter with chocolate chips. This combination is sweet and delicious. Plus, peanut butter is great for increasing your energy levels.
- Pour in granola to make a delicious pre-workout snack or breakfast without using yoghurt. Place in glass jars in the fridge to keep free from bacteria and remain fresh for several days. Then, pour in granola on the day you’ll eat it.
How to Choose a Yoghurt Maker
Yoghurt makes are a great way to create your own recipe and make a delicious snack with incredible health benefits. Below are some important factors to consider when contemplating this kitchen machine.
Number of Pots or Jars
 First, calculate how many yoghurt pots you’ll consume in a day. Bear in mind the number of people in your house, and if they’ll regularly consume yoghurt, too.
If you want to make eight jars of yoghurt in one session, you’ll need a large capacity. Yoghurt can be stored for up to 10 days in a fridge, so you don’t need to consume your creations straight away.
Consider if you’d prefer to create big or small jars of yoghurt. Some people prefer a bigger container since it’s less washing up.
Electric or Non-Electric Makers
A non-electric yoghurt maker was the most popular option years ago, and this type of machine focuses on maintaining the temperature of warm milk, whereas electric makers primarily focus on generating heat. Non-electric yoghurt machine is essentially a thermos for storing warm milk.
Alternatively, an electric yoghurt maker is equipped with heaters, timers, sensors, and controls, helping to simplify the whole process of making yoghurt.
Cleaning
Finally, keeping your yoghurt machine clean isn’t the easiest task. If you own a dishwasher, check that the machine’s components are dishwasher-safe, otherwise, you’ll end up while a pile of washing up after every use. Consider the machine’s design, too. Ones with nooks and crannies can be difficult to clean any separate components.
Dos and Don’ts When Using a Yoghurt Maker
If you’re a beginner, it might take you a while to get used to operating the machine.
Dos:
- Pay careful attention to the milk you use. Full-fat, whole milk provides the best results and makes a thicker texture. UHT milk isn’t as thick, and it’s also not as fresh, so the overall taste won’t be the best.
- Check the label of your store-bought yoghurt, particularly if you will be using it as a starter. The ingredient panel should state the live cultures.
- After each step of making the yoghurt, make sure that the milk reaches the optimum temperature for the best results.
- Once you’ve prepared your yoghurt, strain the mixture into a mesh cheesecloth or strainer. Allow it to drain until it’s reached the desired thickness.
- Sterilise your yoghurt containers or jars using hot water.
Don’ts:
- Avoid disturbing your yoghurt while it’s incubating. You can’t rush the process, and it has to be left alone for around eight hours to set properly. Stirring or mixing the mixture could destroy the incubation process. Remain patient and let it sit for the maximum time.
- Never use old milk. It’s a no-brainer that you won’t use out-of-date milk. But even using milk that’s been sat in your kitchen for several days can affect its taste. By using fresh whole milk, yoghurt will taste more delicious. Plus, it’ll last longer.
- Don’t rush the yoghurt-making process by skipping steps. Always heat the milk to the proper temperature. This allows the proteins to react with the bacteria, thus, creating yoghurt. Otherwise, you’ll be left with runny yoghurt.
What Are Your Tips for Making Homemade Yoghurt?
We hope you enjoyed reading this article about how to use a yoghurt maker, rather than searching through cookbooks for tips and ideas.
If you already own a yoghurt maker, we’d love to hear about which one you own. Choosing a maker can be a time-consuming process, but it’ll deliver the best results. Let us know your recommendations in the comments.
Amy is a U.K.-based writer and editor with a penchant for helping consumers find the best home products for their needs, as well as providing easily digestible guides for living better at home. Her dedication to her work means she can usually be found elbow-deep in research or hunting down samples of the latest and greatest on behalf of her readers.
An avid DIYer herself, Amy’s passion lies in teaching others how they too can achieve their dream homes by tackling some of those pesky projects themselves! Whether it’s building furniture from scratch or turning an old dresser into a coffee table, Amy is always happy to share what she knows about making your house feel like home without spending a fortune.