Last Updated on January 17, 2023
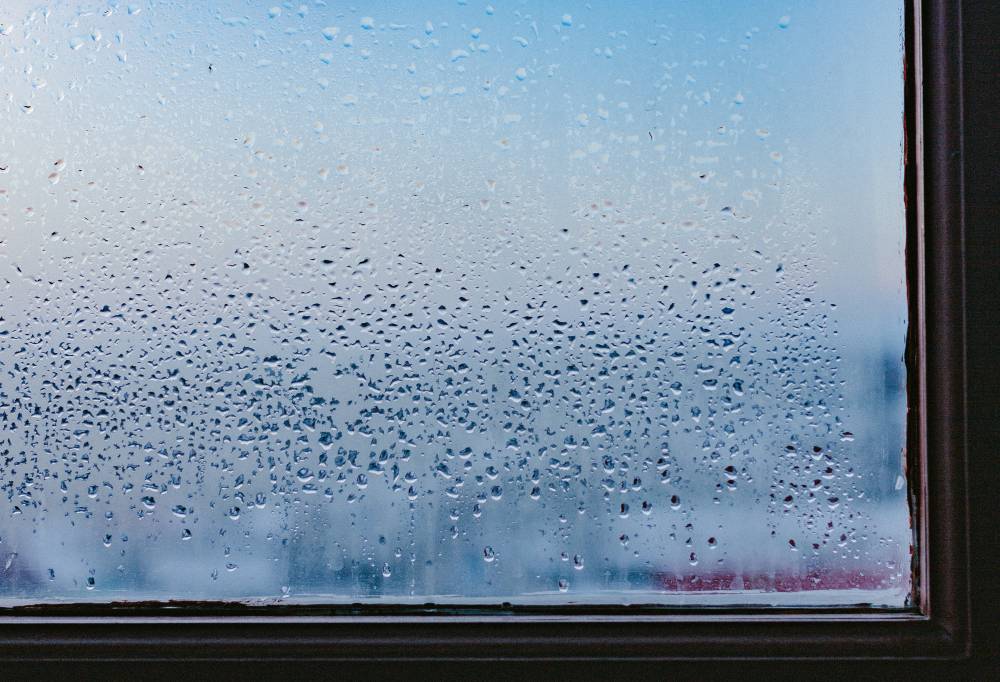
Too much moisture in the air causes excess mould spores to grow, which can be bad for your family’s health as well as unsightly.
You may need an electric dehumidifier in a large area, but you could save money by making a dehumidifier designed for small spaces.
We’re going to show you how to make a dehumidifier. Our eight options listed below are relatively affordable and use items you may already have at home.
Can Homemade Dehumidifiers Work?

Before we look at how to make a homemade dehumidifier, consider if you need one and if you could fix your home humidity problems by making some changes:
- Ventilation – Open windows or use a fan to increase a room’s ventilation and reduce excess moisture.
- Sources of Moisture – Taking long showers, cooking and drying clothes inside can significantly increase relative humidity. Can these be reduced or managed?
A homemade dehumidifier can be surprisingly effective at removing humidity in small spaces. You might need an electric dehumidifier for very high humidity or in large rooms.
However, try a low-cost homemade dehumidifier before buying an expensive commercial unit. Use a damp meter to assess how bad your problem is, and then test again after you’ve tried your own dehumidifier to see if it’s worked.
What Are the Benefits of Making Your Own Homemade Dehumidifier?
Our dehumidifiers use the natural drying properties of various materials to remove humidity from the air. Instead of using an electric dehumidifier, give one of these methods a try, and you can see benefits, including:
- Saving Money – A homemade dehumidifier will only cost you a few pounds to make. You’ll still get the benefits involved with using a store-bought appliance without spending extra money. It might be all you need to solve your mould problems.
- Easy to Make – A DIY dehumidifier is easy to make from basic materials. You can make a natural dehumidifier in very little time to quickly reduce moisture levels.
- Silent – Homemade dehumidifiers use natural materials and are silent, which could be valuable if you want to reduce moisture in a bedroom.
- Lightweight and Portable – Homemade units are pretty light and can be moved around anywhere you need to remove moisture from the air. You can make them as small or as large as you need to tailor them to fit your space. They don’t need electricity so they can do their work anywhere.
8 Ways to Make a Homemade Dehumidifier
So, let’s look at how to make a dehumidifier. We’ll start with one of the most common DIY methods to absorb moisture.
Method 1: Rock Salt Dehumidifier
Rock salt, specifically the sodium chloride part, is highly hygroscopic and efficiently dries damp air. It’s also pretty cheap, relatively safe and readily available. In fact, you might already have a bag of rock salt in your garage from the winter that you can use.
The easiest way to build your rock salt dehumidifier is by using two buckets of the same size that fit together, one inside the other. The bottom bucket is used to collect water, while the top bucket holds the rock salt.
Drill or punch holes in the base of the first bucket — make sure that you only make reasonably small holes so the rock salt doesn’t fall straight through them!
Fill the top bucket halfway with rock salt, and you’re done. Your rock salt dehumidifier is finished and ready to remove moisture from the air.
Check the new dehumidifier periodically and throw the collected salt water away. As the rock salt dissolves, replace it with a fresh supply. If you have to empty the second bucket too frequently, cut some plastic pipe to make spacers to raise the upper bucket to increase the collection capacity.
Method 2: Table Salt
Table salt is sodium chloride, just like rock salt. Although it’s more expensive to buy, table salt has a higher surface area to volume ratio, so it can reduce humidity faster.
You’ve probably noticed that the contents of your salt cellar can go hard pretty quickly. That’s because the salt is absorbing water or extra moisture from the air.
You can use table salt as a simple DIY humidifier in small spaces by simply putting some inside a large bowl: this can work well to reduce humidity in a cupboard or a small room.
Put the salt in a fine mesh bag or even in a pair of repurposed tights to improve the effectiveness. Place the salt bag with a bowl underneath to catch the water. Empty this frequently.
You can enhance your salt dehumidifier even further by adding uncooked rice, just as you might in a salt cellar. The rice absorbs excess water and helps stop the salt from clumping.
Method 7: Charcoal
You can make a charcoal dehumidifier using an old sock, a large bag, or a pair of tights. Fill your homemade dehumidifier with fine charcoal inside, and it will absorb odours and moisture in your room or basement.
Replace the dehumidifier charcoal every few months to ensure your moisture absorber keeps working.
Method 4: Silica Gel Moisture Absorbers
You’ll probably have come across silica gel before: it’s the hygroscopic material in the small paper packets that come with electronic devices, shoes and many other items to help keep them dry during transit. We can use this same material to make a homemade dehumidifier.
Take a clean coffee jar (or similar) and punch several holes in the lid. Fill the jar with silica gel, put the top on and leave the gel to do its work.
Most silica gels come with a colour-changing indicator telling you when the gel is exhausted. You can recharge the dehumidifier silica gel by spreading it out on a metal tray and heating it in an oven at 80°C / 180°F for half an hour.
These moisture absorbers work well in small areas, including inside cabinets.
Method 5: Coffee Whitener
This homemade dehumidifier uses a surprising moisture absorber, coffee creamer — specifically, non-dairy coffee creamer as it contains a lot of dehydrated corn syrup, which is excellent at reducing humidity levels.
Coffee whitener is one of the more expensive dehumidifier materials you can use, so you’ll probably only want to try it if you have access to a cheap bulk supply.
This is one of the easiest DIY dehumidifiers you can make. You’ll only need to put some coffee whitener in a bowl and place it where you need to pull moisture from the air. Check the coffee whitener dehumidifier periodically and change it for a fresh supply when it goes hard.
Method 6: Moisture Absorbing Crystals
You can use moisture-absorbing crystals for a DIY dehumidifier the same way as rock salt. Put the crystals in the upper bucket, and water will collect in the bottom one.
These crystals are used in commercially available dehumidifiers, so they are very effective. You will save money by doing it yourself rather than paying for fancy housing.
Just make sure you empty your DIY dehumidifier collection bucket frequently and replace the crystals when the colour indicator changes.
Method 7: Calcium Chloride
A DIY dehumidifier with calcium chloride inside is even more effective as a moisture absorber than salt.
Like with the table salt method, you can fill a fine mesh bag or a stocking with calcium chloride granules and hang the tied bag over a large bowl to collect the water.
The calcium chloride dissolves as it collects water, so make sure you have a big enough collection container otherwise, you’ll be clearing up a chalky mess. Empty the bowl frequently down a drain and refill the bag with new calcium chloride.
Method 8: Baking Soda
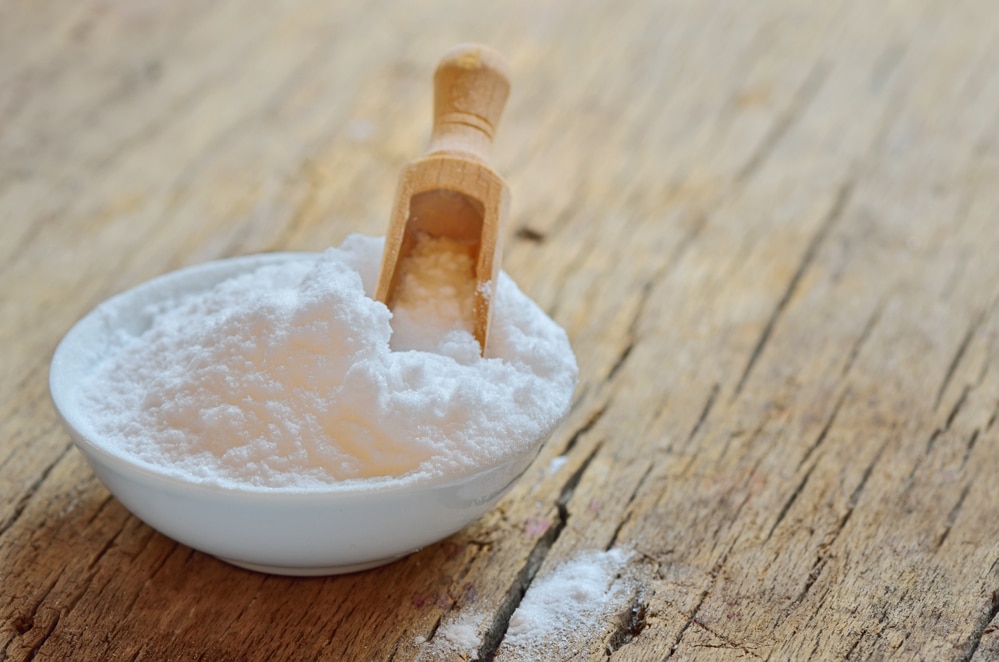
Finally, you can make a homemade dehumidifier using baking soda. Just like charcoal, baking soda will absorb odours and any excess moisture.
All you need to do is open a box and place it in the humid area you need to dry. Replace the baking soda when it starts to harden.
Making Your Own Dehumidifier
We hope you found this guide on making a homemade dehumidifier helpful. Give each one a go and find which dehumidifier works best at reducing humidity and dampness in your room, basement or other space.
If you have questions about this topic, feel free to leave us a comment. For more home appliance tips and tricks, check out our other DIY guides!
Paul is the type of person who never met a problem he couldn’t fix. He can always be found tinkering with something in his house, even if it isn’t broken! His tips and tricks are often shared on our site. He’s the one you call when something breaks because he has been known to improvise fixes for everything from leaky faucets to malfunctioning dryers.