Last Updated on January 10, 2023
If your electric chainsaw is not cutting wood like it used to, you need to check if its chain needs replacement. The chain can become blunt and lose its functionality after a certain period. Having a new chain makes it easier for you to work smoothly and helps you cut better.
It be may quite challenging and costly to repair a chain. Fortunately, you can replace the chain of an electric chainsaw in less than 20 minutes. Unlike a gas chainsaw, replacing a chain on an electric chain saw is relatively easy.
Chainsaw chains are available in different types and designs. Make sure that you replace your tool with a chain that is compatible with it. Be sure to check the information guide of your device. It can give some insight into the type of chain that you should be using on your saw. You can also check with the manufacturer’s official website.
After you’ve gathered all the correct information, it’s time to learn how to replace the chain on an electric chainsaw.
Chain Replacement Step-by-Step Guide
Replacing and fitting a chainsaw chain is fairly easy. These steps will ensure that you replace the chain on your electric chainsaw safely and correctly:
Step 1: Unfasten the Bar Nuts on the Chainsaw
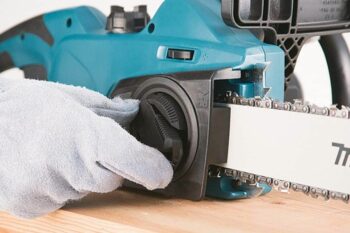 Safety is crucial in chainsaw use. Before you start this procedure, wear a pair of gloves. A pair of gloves will protect your hands as you replace the chainsaw chain on your electric chainsaw. It is a chainsaw safety precautionary measure you should never skip.
The side plate and sidebar of most electric chainsaws are held into position by various nuts. To remove the chain, you have to unfasten the nuts. Use a socket wrench or a screw wrench to detach some of the bar nuts that might be on the side plate of your electric screwdriver. After that, please place them in a safe container.
On the other hand, some models have a sprocket cover/chain cover that can be easily removed. Such covers have a knob that allows you to detach the chain cover from the electric chainsaw. All you have to do is to turn the knob of the cover counterclockwise.
In some models, the brake of the chain saw might be connected to the side plate. If that’s the case, you have to unlock the brake.
Step 2: Remove the Chain From Your Electric Chainsaw
The next thing that you need to do is to remove the chainsaw chain from the electric saw. Remove the cover to access the chain. After that, hold the guide bar of the electric chainsaw and pull it away from your saw. If you do this, the chain tension will reduce, and the chain will drop.
Remove the chain from the guide bar of the electric chainsaw. You can detach the guide bar from the main unit and remove the chainsaw chain. This also makes it easier for you to fix a new chain on your electric chainsaw after removing the old one.
Step 3: Clean the Surface of the Electric Chain Saw
Clean the main unit of the electric chainsaw. This makes it easier for you to get rid of the wood chips stuck on your electric chainsaw. You can clean the chainsaw with a wet cloth or a dry cloth based on your preferences.
Make sure that you also clean the oil hole. This is the part that lubricates the chainsaw chain. Keep your chainsaw well-maintained to prolong its lifespan.
Step 4: Determine the Direction of the Chainsaw Chain Cutters
Most electric saws come with a drawing/photo that shows you the direction of the chain. The cutter head should point in the right direction. If the chain faces the wrong side, it might not be quite effective in cutting wood.
Step 5: Thread the New Chain on the Tip of the Guide Bar
The guide bar has a wheel that guides the chain as it is rotating. The wheel is found on the tip of the guide bar.
Position the chain, then slip the drive links into the bar groove. Drive links are the teeth that are found on the underside part of a chain. The teeth can slide easily into the groove of the guide bar. The drive links of the chain should be positioned along the guide bar of the electric chainsaw.
View this post on Instagram
Step 6: Fasten the Bar to Your Electric Chainsaw
Start by placing the chainsaw bar on the bolt that holds it. After that, fit the chain on the sprocket. Adjust the chain until it fits perfectly. Apply some pressure on the tip of the chain to stop it from snapping out of the guide bar.
See to it that you place the chain on the right fitting. This way, you can ensure that it will remain still.
Step 7: Cover the Sprocket of the Electric Chainsaw
A sprocket cover adds some tension to the chain and keeps it steady in one position. Place the sprocket cover on the bolt that holds it. After that, place a nut on the blot, then fasten it.
Step 8: Adjust the Chain Tension on the Guide Bar (Tighten the Chain or Loosen It)
Electric chainsaws come with a tension screw that allows you to adjust the tension of the chain. Start by checking the chainsaw chain slack. If you want to increase the chain tension, you can tighten the chain screw using another tool. On the other hand, if you don’t want your chain to be so tight, you can reduce the tension by unfastening the tension screw.
Maintaining Your Electric Chainsaw
Instead of spending a lot of money to repair a chain, you can learn how to replace the chain on an electric chainsaw yourself. Since chainsaw chains come in different sizes and different, you have to opt for one that is compatible with your chainsaw.
Once you replace the chain, return all the parts to their original position. You should also countercheck the saw to see if you have connected all the parts. After that, start the electric chainsaw and test if it works and cuts efficiently or not. If you’ve followed the steps correctly, the new chain will help you work smoothly.
Have you tried replacing the chain of an electric chainsaw? Tell us all about it in the comments.

Ian loves everything that revolves around the home improvement niche. He loves trying out new home appliances. He has also handled a lot of equipment and has a lot of insight. Plus, he’s worked on various home improvement projects that became a success. If Ian isn’t busy working on his latest project, you can find him reading up about another one!