Last Updated on February 10, 2023
Leather is a beautiful, durable material that can be used for many projects. But did you know it’s possible to sew leather with a sewing machine? If you’re new to this process and want some guidance on how to get started, then look no further. In this blog post, we’ll walk through the steps of preparing your supplies and threading your machine correctly so you can successfully learn how to sew leather on a sewing machine like an expert. We’ll also provide tips for achieving great results every time. So let’s dive in – if all goes well by the end of this guide, you’ll have created something truly special out of leather.
Table of Contents:
- Gather Your Supplies
- Prepare the Leather
- Thread Your Machine
- Sewing Techniques
- Finishing Touches
- FAQs in Relation to How to Sew Leather on a Sewing Machine
- Conclusion
Gather Your Supplies
Gathering the supplies needed to sew leather on a sewing machine is an important step in any project. To get started, you’ll need some basic materials and tools.
First, you’ll need the leather itself. Choose a type of leather that suits your project’s needs – for example, if you’re making a bag or purse, select something sturdy but flexible, like cowhide or suede. You may also want to pick up some extra pieces of scrap leather for testing out different techniques before committing them to your main piece.
Next, make sure you have enough thread and needles suitable for working with thick fabrics like leather. Look for heavy-duty polyester threads and large-eye needles designed specifically for use with thicker fabrics; these will help ensure that your stitches are strong and secure when they come into contact with the tough material of the leather.

Finally, make sure to include a pair of sharp fabric scissors in your supplies. Look for ones designed specifically for cutting through thick fabrics such as denim or canvas so that they can handle heavier materials like suede and cowhide without quickly becoming dull. Additionally, you may want to consider investing in tools such as thimbles (for pushing down on the needle) and seam rippers (for removing mistakes).
Once all these supplies are gathered together, it’s time to move on to preparing the leather itself. Before doing so, double check that all necessary items are present and accounted for.
Once you have all the necessary materials, it’s time to get started on preparing the leather for sewing.
Prepare the Leather
Leather is a versatile material that can be used for many different projects. Whether you’re making a wallet, belt, or bag, it’s important to prepare the leather before you start sewing. Here are some tips on how to get your leather ready for stitching:
Cutting
First, measure and mark the desired shape and size of your project on the leather with a pen or marker. Then use scissors or an X-Acto knife to cut out the pattern. Make sure all edges are smooth and even by using sandpaper if necessary.
Punching Holes
To make holes in the leather so that you can stitch it together, use an awl or hole punch tool to create small punctures in each corner of your design. This will help guide your needle when sewing later on.
Smoothing Edges
After cutting out your pattern from the leather, check for any rough edges that may have been left behind during cutting. Use sandpaper to gently buff away any jagged pieces until they are smooth and even with one another.
These steps should help ensure that your finished product looks professional and polished. With these tips in mind, you can easily prepare any piece of leather for sewing without encountering any issues.
Once you have the leather ready to go, it’s time to thread your machine and get started on this exciting project.
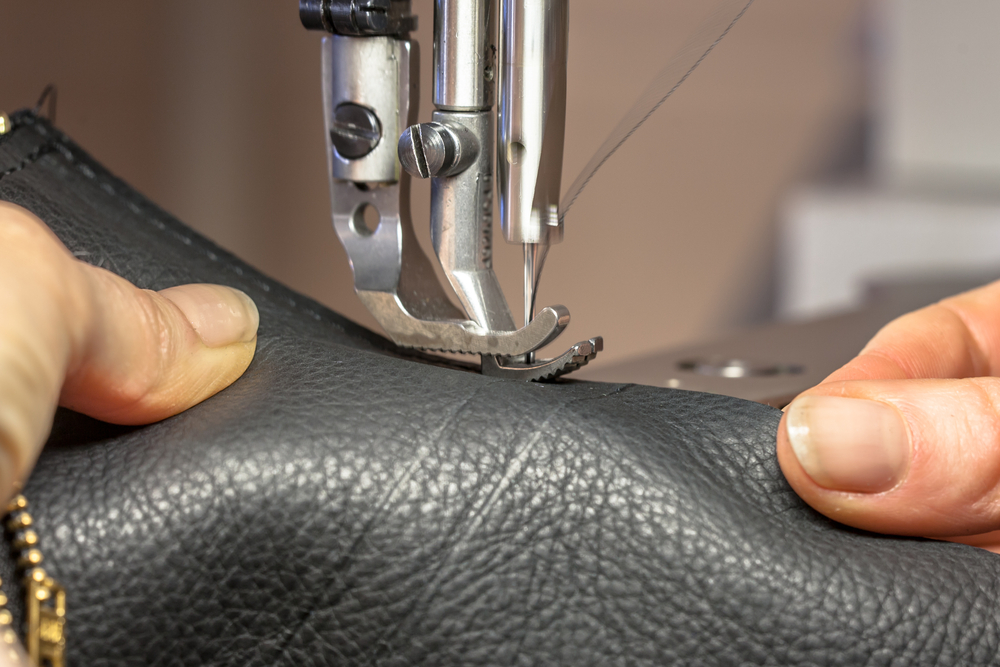
Thread Your Machine
Threading a sewing machine for leather work is an important step to ensure the best results. It requires using a heavy-duty needle and strong thread that can withstand the pressure of thick fabric. Here are some tips on how to properly thread your machine:
1. Start by inserting the needle into its designated slot, making sure it’s facing up and straight. Tighten the screw at the top of the needle with a small wrench or pliers if necessary.
2. Next, take your spool of thread and place it in its holder above your machine, ensuring that it is secure so it won’t move while you’re working. Pull out about 18 inches of thread from the spool before cutting off any excess length with scissors or wire cutters if needed.
3. Now, you need to guide your thread through several different parts of your machine before reaching its final destination –the needle itself. Start by feeding one end of your thread through one side of tension discs located near where you inserted your needle earlier; then feed it around another set located just below them before looping back up towards where you started from again (this will help create even tension when sewing). Finally, pull both ends down towards the bottom part called the “take-up lever”, which should be visible right underneath where all other threads converge together—here’s where they’ll finally meet their end point.
Lastly, adjust settings according to the type and thickness of the material being used for the project at hand; heavier fabrics require higher tensions than lighter ones do, so keep this in mind when setting up accordingly.
Once you have threaded your machine, it’s time to learn the different sewing techniques that will help you create a beautiful leather piece.
Sewing Techniques
Sewing leather can be a tricky task, but with the right techniques and tools, it can be done with ease. Topstitching is one of the most common methods used to sew leather on a sewing machine. It involves stitching along an edge or seam using two parallel rows of stitches that are evenly spaced apart. This technique is great for reinforcing seams and edges, as well as adding decorative details to your project.

Edge stitching is another popular method for sewing leather on a sewing machine. This technique requires you to stitch along the edge of the material in order to create a neat finish and prevent fraying or unravelling over time. Edge stitching also helps keep seams together while providing extra strength and durability to your finished product.
Zigzag stitching is another option when it comes to working with leather on a sewing machine. This type of stitch creates an overlapping pattern which helps secure fabric pieces together more securely than straight stitches alone would do. Zigzag stitches are also great for creating decorative patterns such as chevrons or stripes on garments or accessories made from leather materials like purses, wallets, belts, etc.
Once you have mastered the basics of sewing leather on a sewing machine, it’s time to move on to the finishing touches. These include adding decorative elements and ensuring that your seams are secure and finished properly.
Finishing Touches
Finishing touches are the most important part of any home and garden project. It’s the difference between a well-crafted piece that stands out, and one that looks amateurish.
Using an Overlock Stitch
An overlock stitch is a great way to give your projects a neat finish. This type of stitch is created by looping two or more threads together around the edge of the fabric. The result is a secure seam with clean edges that won’t fray or unravel over time. To use an overlock stitch, start by threading your machine with matching thread colours for both top and bottom needles. Then adjust the tension, so it’s tight enough to hold but not too tight as to cause puckering in the fabric. Finally, set your machine to create an overlock stitch and sew along each edge of your project for a finished look.
Using a Binding Tape
Binding tape can also be used to finish off projects with neat edges and secure seams. This type of tape comes in various widths and colours, so you can find something that matches whatever material you’re working with perfectly. To use binding tape, simply cut it into strips slightly longer than each side of your project, then fold them in half lengthwise before ironing them onto each side using steam heat from the iron on a low setting (or no steam). Once all four sides have been secured with binding tape, press down firmly on each corner for extra reinforcement before trimming away any excess fabric or tape at the ends.
FAQs in Relation to How to Sew Leather on a Sewing Machine
What tension should I use to sew leather on sewing machine?
When sewing leather on a sewing machine, it is important to use the correct tension. Generally, you should set your machine’s stitch length to a longer setting and increase the tension slightly higher than when working with other fabrics. This will help prevent puckering or tearing of the leather. It is also important to use an appropriate needle size for the thickness of your leather – typically between 14-18 gauge – as well as a strong thread that can handle friction from passing through multiple layers of material. With these tips in mind, you can confidently sew leather on your sewing machine.
What stitch to use for leather?
Leather is a durable material that can be used for many different projects. The type of stitch you use depends on the thickness and weight of the leather, as well as what kind of project you are working on. For lighter-weight leathers, a simple running stitch or whipstitch works best. For heavier-weight leathers, an overcast stitch or saddle stitch is recommended. Both stitches provide strong seams and will hold up to wear and tear better than other types of stitching. When in doubt, consult with a professional tailor who specializes in leather work for advice on which type of stitching to use for your project.
Conclusion
With the right supplies, preparation and techniques, you can easily sew leather on a sewing machine. It’s important to remember that when working with leather, it takes patience and practice to get the perfect results. With a bit of time and effort, you’ll be able to create beautiful pieces that will last for years.
Paul is the type of person who never met a problem he couldn’t fix. He can always be found tinkering with something in his house, even if it isn’t broken! His tips and tricks are often shared on our site. He’s the one you call when something breaks because he has been known to improvise fixes for everything from leaky faucets to malfunctioning dryers.