Last Updated on January 10, 2023
If you’re wondering how to thread a sewing machine, then you’re in the right place.
A sewing machine can make your life a lot easier, particularly if you deal with a number of textile-based projects. However, before you can make your first stitch, you need to know how to thread the system. Threading a sewing machine is a little different than simply adding thread to the eye of a needle for manual sewing.
The good news is that most sewing machines are quite similar. This ensures that you can find plenty of videos, and articles like this one that can teach you how to set up your new device.
Do keep in mind that it’s best to check the instruction manual provided by the manufacturer before you get to work on threading, however. Most instructions will be able to answer any questions you have about where certain parts of the machine are located, such as the thread guide, spool pin, and pressure foot, for instance.
Remember, when you’re threading a sewing machine for various sewing patterns, you’ll need to thread both your bobbin and top spool.
The Importance of Proper Threading
Learning how to thread a sewing machine properly is crucial if you want to achieve attractive stitches that remain secure over time. You’ll need to know how to use the lever, bobbin case, and various other parts of your machine to ensure that every stitch turns out right.
View this post on Instagram
Most machine threading processes are the same. So after you’ve practised using things like a bobbin winder and tension discs for the first few times, you should develop a decent amount of confidence.
After checking the instructions in the machine manual that is provided by your sewing machine manufacturer, make sure that you’re in a position where you can easily work on your sewing machine. Remove anything that might snag the needles or threads around you.
It’s also worth ensuring that you’re using the right needles and threads for the project in question. A thick thread will need a larger needle. Also, the same will be required if you’re working on thicker material. Before you begin threading the sewing machine, make certain:
• The machine is cleaned and oiled, particularly if it’s a little older.
• You’ve checked the instructions for any extra guidance.
• You have a piece of scrap material to test the threading before you begin sewing.
• The thread you’re using is good quality (to prevent excessive lint).
• Your sewing machine needle is in good condition.
How to Thread a Sewing Machine Step by Step
If you’re a beginner to using a sewing machine, you might be surprised to learn that threading this device will require you to load two sets of threads. You’ll need an upper thread, or top thread, and a lower spool or bobbin. The machine weaves the two threads together to create the stitches for your sewing projects. While each sewing machine can be slightly different when it comes to threading, there are some general thread guide tips that most users can follow.
Step 1: Wind and Load the Bobbin
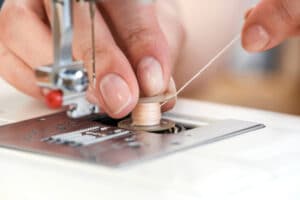 Before you thread the needle, you need to load the bobbin.
The bobbin is the lower spool of thread in your sewing machine that is required to finish the stitch. If you don’t already have a wound bobbin, you’ll need to get a thread spool and wind your own. To do this, place a spool of bobbin thread on your machine’s thread pin, and pull the thread to the left of the machine, winding it counterclockwise – unless the sewing machine manual advises winding to the other side of the machine.
Direct the thread through the small holes in the empty bobbin, winding the thread around the centre pillar of the bobbin several times. You’ll need to place the bobbin inside of the bobbin winder pin which is usually on the top of the machine, to the right size. Press the foot pedal of your machine, and the bobbin should begin winding naturally.
Once you have a wound bobbin, place it in the little compartment underneath the needle, known as the bobbin case. This bobbin case is where your thread end needs to be to supply the lower part of your sews. Lift your needle and presser foot to the highest position possible, using a hand wheel if necessary, and place the bobbin in the slot under the bobbin cover. Pull the thread end through the tension spring before replacing the cover.
Step 2: Place the Upper Thread
The second thread you’ll need to secure in your sewing machines is the upper portion of the stitch. Place a spool of thread on the thread pin also called the spool holder or spool pin. This is usually located towards the top of the machine. Grab the thread end and pull the thread to the left of the machine to direct it through the thread guide.
Pull the end through the guide into the deeper groove in the front of the machine. Most sewing machines have a U shaped space where you’ll need to place the thread. You should then be able to bring the thread end back up through the second groove to the left of the machine. Carefully wrap the thread around the take-up lever at the top of the second groove in the machine.
Pull the thread from the top part of the stitch down towards the sewing machine needle. You’ll need to place a needle within the machine using the instructions provided at this part of the process. It may be easier to use a pair of tweezers to ensure that you get the needle locked into the mechanism correctly. A loose needle can be dangerous.
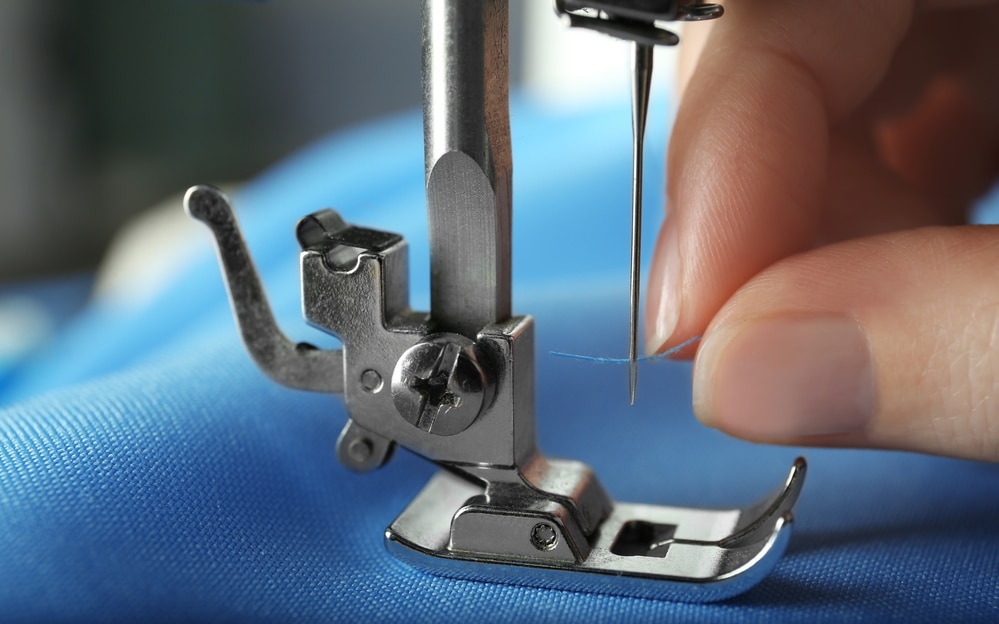
Step 3: Catching the Thread
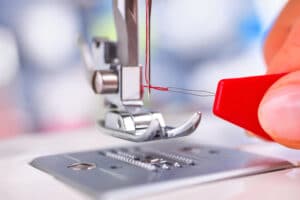 Pull the thread through the eye of the needle, from the front to back, and continue to pull until you have several inches of thread through the eye. Some machines also have an automatic needle threader to help with this. Once your top threading and bobbin are set up, you can connect the two to start your sewing patterns.
Using your needle position lever or button, lower the needle down and back up again. This should cause the needle to catch the bobbin thread and pull it out in a loop. You can then pass a flat object underneath the needle to grab both strands and position them out of the way while you’re sewing. You may need to hold these out of the way in the initial stages of the process.
Remember to check the tension on the thread and the needle using the tension wheel. A lack of tension could cause your stitching to be loose, while too much tension causes the needle to pull on the fabric.
Tips for Threading a Sewing Machine
Learning how to thread a sewing machine and a bobbin can seem quite complicated at first. When you thread a sewing machine, you’re not just pulling thread through the eye of a needle. You need to thread two separate parts of the machine and keep an eye on where the end of the thread ends up. All the while, you’re dealing with the presser foot, tension, and the bobbin case.
If you’re eager to start sewing and you feel like you need a tip or two to help you come to terms with sewing machine products, the following insights might help.
Use a Marker
When you’re threading a sewing machine needle, putting something white behind it can make it much easier to see the eye. This can be particularly helpful when the mechanism of the sewing machine makes it harder to see.
Use Sharp Scissors
When you’re cutting the top and bobbin thread on the left or right side of your machine, make sure that you keep the tip clean by using sharp scissors. This will make the thread easier to pass through the eye of your needle in the future.
View this post on Instagram
Cut the Thread at an Angle
Cutting your thread at an angle can also make it easier to get through the eye of a needle when you want to start sewing quickly. Keep this in mind for both your bobbin and top thread.
Stiffen the Thread
You may not be able to do this for your bobbin, but you can use wax or a drop of water to stiffen the thread when you want to start sewing with a new upper thread. This will help you to hold the thread steady as you place it in the eye of the needle.
Use a Needle Threader
If you’re struggling with your bobbin or top thread, use a needle threader. These devices often come with a selection of thread spool choices. Sometimes, your sewing machine might come with its own needle threader.
Use Tweezers
If you’re using a small needle with a very small eye, then you can use tweezers to help with getting the end of the thread into the needle. Remember to keep your presser foot out of the way while you do this. Tweezers with a slanted edge are often best for those who want to start sewing with a machine.
Good Luck Threading Your Machine
Learning how to thread a sewing machine doesn’t have to be complicated. Sewing machines often come with various tools that help you to master the threading process. Search close to home if you’re looking for guidance on how to thread properly, and you’ll usually find instructions somewhere.
Once you know how to thread the needle of your sewing machine, you’ll discover that terms like presser foot and bobbin case aren’t as complicated as they seem.
Rebekah is a writer who loves to explore new products and find hacks that make life easier. She has a knack for all things home improvement, health and fitness. So you’ll often find her on Pinterest or browsing Houzz for ideas.
She’s always looking for the next thing to fix up around the house or what gadget might be just right for her lifestyle. Rebekah enjoys exploring new recipes, taking care of her family, and making sure she stays healthy with regular workouts at the gym.