Last Updated on February 9, 2023
Sewing has always been an art form, but with the invention of handheld sewing machines, it’s now easier than ever to create beautiful pieces from home. Whether you’re a novice or an experienced sewer, learning how to use a handheld sewing machine is essential for taking your projects up a notch. From mastering stitching techniques and troubleshooting problems to finding project ideas and proper maintenance – this guide will help you understand everything there is to know about using a handheld sewing machine. So get ready to unleash your inner seamstress as we dive into all things related to making magic happen with these amazing tools.
Table of Contents:
Getting Started
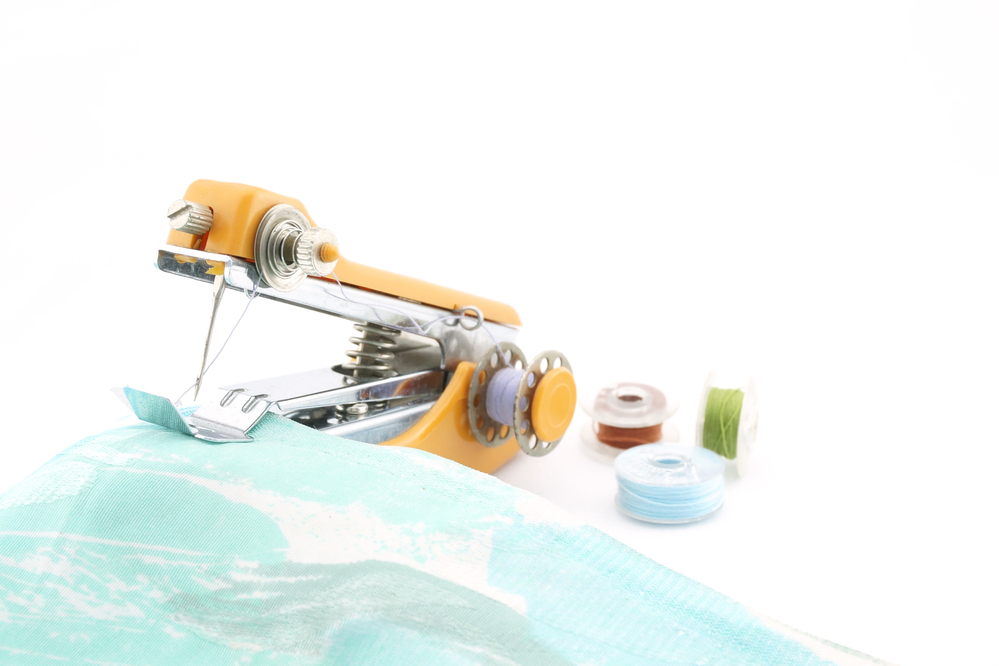
Handheld sewing machines are a great way to take your craft projects to the next level. Whether you’re an experienced seamstress or just starting out, these small but mighty tools can help you tackle any project with ease.
A handheld sewing machine is exactly what it sounds like: a miniature version of a regular sewing machine that fits in the palm of your hand and runs on batteries or electricity. It’s perfect for quick repairs, mending hems, and even making small garments like doll clothes.
To get started with your handheld sewing machine, first make sure you have all the necessary supplies – thread, fabric scissors, pins, etc. Once everything is ready to go, follow these steps:
1) Thread the needle by looping one end through the eyelet at the top of the needle and pulling it tight; then tie off both ends in a knot at the base of the needle shaft.
2) Set up your fabric by laying it flat on a hard surface and pinning down any loose edges, so they don’t move around while you sew.
3) Select which stitch type you want to use (straight stitch or zigzag). Most machines will come with several pre-programmed settings for different types of stitches, so choose whichever one best suits your project needs.
4) Place your fabric under the presser foot and lower it onto both layers using either manual pressure or an automatic lever depending on the model type; this will hold them together as you sew.
5) Start stitching. To do this, simply turn on the power switch (if electric), press down the foot pedal (if manual), and guide the fabric along a desired path using your free hand – be careful not to pull too tightly as this could cause puckering – and let the machine do its work until desired length/pattern achieved. Finally, cut off excess threads from the finished product when done stitching.
Once complete with the setup and stitching process, there are a few maintenance tips worth noting. Such as regularly cleaning lint build-up from the bobbin case area after each use and oiling moving parts every six months if possible. Doing so will help keep the device running smoothly over time. Additionally, always store away safely when not being used to prevent accidental damage due to dust particles settling onto delicate components inside the unit itself, thus leading to potential malfunction issues later down the line. As such, it is best practice to invest in a protective cover or bag specifically designed for this purpose.
Stitching Techniques
Stitching is an essential part of any home or garden project. Whether you’re making a quilt, repairing clothing, or creating custom curtains for your living room, having the right stitching techniques can make all the difference in how your finished product looks and feels. With a handheld sewing machine, it’s easy to get started with basic stitches like straight stitch and zigzag stitch.
Straight Stitch
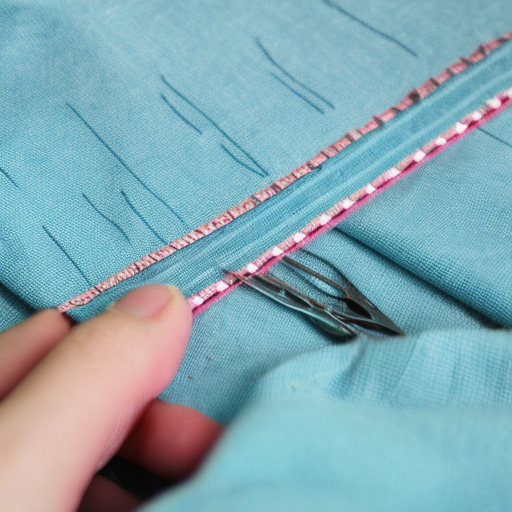
The most common type of stitch used in sewing projects is the straight stitch. It’s simple to do and creates a neat line that holds fabrics together securely without adding bulkiness. To create this type of stitch on a handheld sewing machine, start by threading the needle according to the instructions provided with your machine. Then set the length dial to “0” for regular stitching or adjust it higher if you want longer stitches. Finally, press down on the foot pedal while guiding the fabric under the needle as desired until you reach your end point; then release pressure from the foot pedal and lift up the fabric slightly before cutting off the excess thread at both ends using scissors or small snips tool included with some machines.
To create this type of stitch on a handheld sewing machine, first, select the ‘zigzag’ setting from the width/length dials. Then follow the same steps as mentioned above for straight stitching but instead guide the fabric back-and-forth across the needle so that each time it passes over creates a zigzagging pattern along the seamline which will provide greater strength than one single pass alone. Additionally, you can use an adjustable tension knob located near the top left corner (depending on the model) if necessary; increasing tension results in tighter looking stitches while decreasing tension yields looser ones – experiment until the desired effect is achieved.
For delicate materials such as silk chiffon, the overcasting stitch is a great choice due to its strength and softness. To achieve this look, start by selecting the appropriate setting from the width/length dials (usually labelled “overcast”). Then proceed in the same way described earlier, except instead of passing through only once per side, go twice – with the first time close to the edge and the second further away depending on the material being worked with (experimentation may be required). After completing your seamline, cut off any excess threads using scissors or a snips tool again, if applicable.
Once you have mastered the basics of stitching techniques, you can move on to troubleshooting common problems with your handheld sewing machine.
Troubleshooting
Troubleshooting a handheld sewing machine can be tricky, but with the right tips and tricks, you can get it working like new in no time. Here are some common problems and solutions to help you out:
1. Threads Keep Breaking
This is usually caused by using an incorrect needle size or type for your fabric. Make sure to use the correct needle size for your project and check that it’s not bent or damaged before starting. If threads keep breaking after changing needles, try adjusting the tension on your machine, as this may help reduce breakage.
2. Fabric Not Feeding Through Properly
If the fabric isn’t feeding through properly, make sure that there aren’t any knots in the thread or bobbin case, as these will cause jams and stop the fabric from moving freely underneath the presser foot. Also, ensure that you have set up your machine correctly according to manufacturer instructions so that all parts are lined up correctly when stitching begins.
3. Machine Is Skipping Stitches
Check if there is lint build-up around the feed dogs (the metal teeth under the presser foot) which could be causing skipped stitches – use a soft brush to remove any debris, then rethread both the top and bottom of your machine before testing again. Additionally, check if you’re using too thick of a thread for what’s recommended by checking your manual or online resources for advice on suitable thread types/weights for different fabrics/projects being worked on Finally, adjust stitch length settings – longer stitches tend to skip less than shorter ones.
Maintenance & Care
When it comes to maintaining and caring for a handheld sewing machine, the key is regular maintenance. This includes cleaning, lubricating, and checking for any loose parts or worn-out components.
Cleaning
It’s important to keep your machine clean by wiping down the exterior with a damp cloth after each use. Make sure to remove any lint from the bobbin case and needle plate as well as from around the feed dogs. Additionally, you should periodically oil your machine according to manufacturer instructions in order to ensure the smooth operation of all moving parts.
Lubrication
Lubricate all metal surfaces with lightweight oil such as 3-in-1 oil every few months or when you notice squeaking sounds coming from inside the machine while stitching. Apply a few drops of oil on both sides of each metal surface, including gears, cams, shafts etc., then turn on your machine at low speed for about 10 seconds in order to distribute it evenly throughout these areas before turning it off again.
Checking For Loose Parts & Worn Out Components
Inspect all screws and bolts regularly for tightness; if they are loose, tighten them using an appropriate screwdriver or wrench depending on the size and type of fastener used (e.g., Phillips head vs flathead). Also, check that there are no frayed wires or broken plastic pieces which could cause problems during operation; replace them immediately if necessary. Finally, make sure that none of the internal components, such as springs, have become worn out over time – replace those too, if needed.
In conclusion, proper maintenance and care will help keep your handheld sewing machine running smoothly so you can continue creating beautiful projects without interruption.
By taking proper care of your handheld sewing machine, you can ensure it will last for many years. Now let’s look at some project ideas that you can do with this versatile tool.
Conclusion
Using a handheld sewing machine can be a great way to add unique touches to your projects. Whether you’re making clothes, accessories, or home decor items, the possibilities are endless. With practice and patience, you’ll soon become an expert in using this handy tool. So go ahead and get creative – let your imagination run wild with what you can create when you use a handheld sewing machine.
Paul is the type of person who never met a problem he couldn’t fix. He can always be found tinkering with something in his house, even if it isn’t broken! His tips and tricks are often shared on our site. He’s the one you call when something breaks because he has been known to improvise fixes for everything from leaky faucets to malfunctioning dryers.